Generating Blog Social Images
Since I launched my new blog, I discovered that social images were broken; they were an afterthought after all, and I decided to fix it permanently.
I was planning to add social images to my posts for a long time, and when I launched this version of the website, I didn’t really put any effort into making this happen. As soon as I shared the launch post, I discovered that many things were broken with social images, from errors in URL encoding to a wrong background image on each social image.

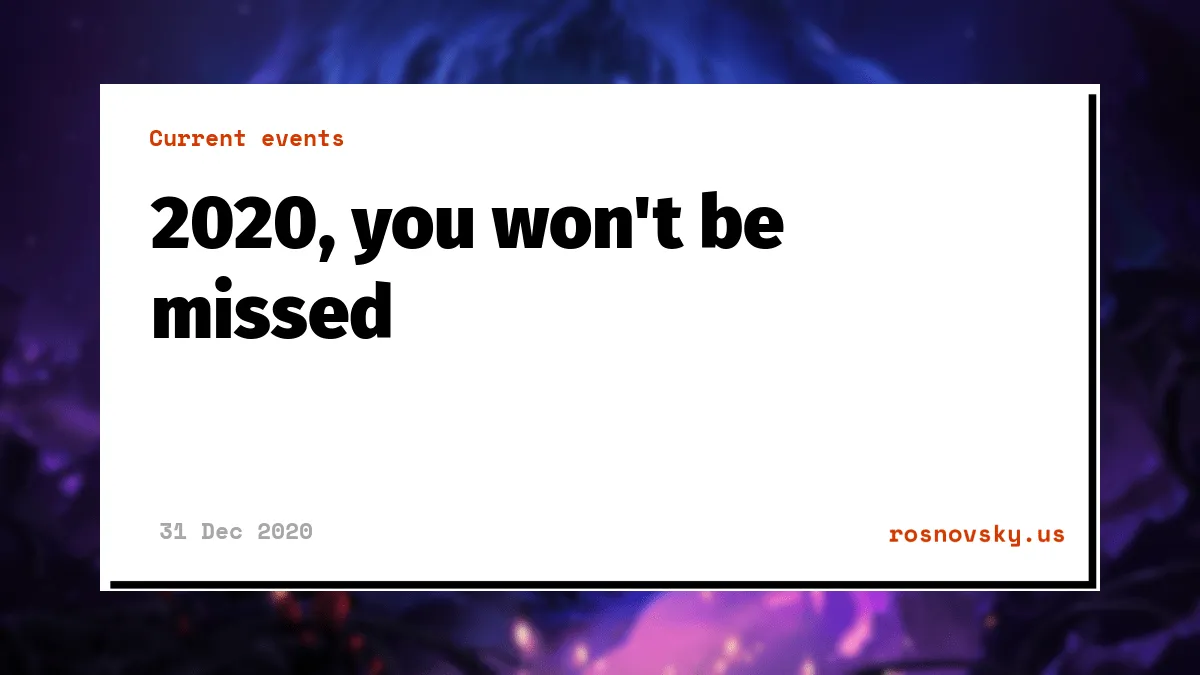
As you can see, the background here belongs to a different post, although this particular card doesn’t have any other obvious issues. In any case, this is something I wanted these cards to actually look like.
It’s not perfect, but here’s what’s going on this card:
- There’s a blurred cover image that belongs to this particular post in the background
- A card with post info is overlayed on top of this background image
- Correct category and post date
- There’s a short summary of what the post is about
There are different approaches one could take here, from passing parameters of an image directly to a service like Cloudinary to generating a screenshot. Without going into obscure details, here’s how I made this happen.
Step One: Generate a card
I created a page, that generates a webpage with all the data I pass to it: title, publication date, category, etc.
Here’s an example: this link leads to the page that builds the social card.
All this is is an HTML page dynamically generated based on passed parameters. It’s this basic but opens a ton of flexibility. This page is just one of my other pages on this website.
<div className="m-0 flex w-full">
  <div
    className="relative border-1 bg-transparent w-full border-red-900 p-6"
    style={{
      backgroundImage: bgUrl,
      backgroundRepeat: 'no-repat',
      backgroundSize: 'cover',
      backgroundBlendMode: 'overlay',
    }}
  >
    <main className="flex-col p-5 bg-opacity-80 bg-white border-2 border-black">
      <h3 className="text-red-900 font-bold font-mono text-xl w-96">
        {category || 'No category'}
      </h3>
      <h1 className="text-6xl leading-tight font-black mt-7">
        {title || 'No Title'}
      </h1>
      <p className="prose prose-2xl mt-8 mb-10">{subtitle}</p>
      <div className="flex justify-between">
        <p className="prose prose-lg text-2xl text-red-900 font-semibold font-mono">
          {date || 'No date'}
        </p>
        <p className="font-mono text-2xl font-bold underline text-red-900 ">
          rosnovsky.us
        </p>
      </div>
    </main>
  </div>
</div>
Step Two: Capture a screenshot
Now we need to turn this page into an image. I use a serverless function to do this. This function accepts required parameters, passes them to the social card page, takes and returns a screenshot. There are different ways of doing this, and I opted for a headless Chrome. I’ve written a function that loads the page generated in the previous step and takes a screenshot of a viewport of the size I like (780x420 in my case). Again, without going into obscure details, here’s what it looks like:
const takeScreenshot = async function(url) {
  const browser = await chromium.puppeteer.launch({executablePath: local
    ? '/Applications/Google Chrome.app/Contents/MacOS/Google Chrome'
    : await chromium.executablePath,
  args: chromium.args,
  defaultViewport: chromium.defaultViewport,
  headless: chromium.headless,})
  const page = await browser.newPage()
  await page.setViewport({ height: 420, width: 780 })
  await page.goto(url)
  const buffer = await page.screenshot()
  await browser.close()
  return `data:image/png;base64,${buffer.toString('base64')}`
}
Depending on whether I’m developing or this runs in production, this function takes a URL to the card page, launches headless Chrome, takes a screenshot, and returns a base64-encoded image.
Step Three: upload image to Cloudinary (or anywhere, really)
This is the easiest and the most arbitrary step. I wanted to use Cloudinary in some way to learn more about it, and although here I only use it as image hosting, I was able to poke around it for a bit. Anyway, in this step, we take the image we got in the previous step and just upload it to Cloudinary:
const uploadImage = async function(title, buffer) {
  const cloudinaryOptions = {
    public_id: `social-images/${title}`,
    unique_filename: false
  }
  return await cloudinary.uploader.upload(buffer, cloudinaryOptions)
    .then(response => response.url)
}
Step Four: return something
Again, there are different options here: you could return a permanent redirect with HTTP 308 Permanent Redirect status, or just respond with an OK and move on. The difference is in the way you incorporate the resulting image URL into your HTML. Some might add the URL of the serverless function that captures and uploads a screenshot right inside of a <meta> tag: in this case, permanent redirect makes sense. As soon as someone requests the page, they will attempt to read the meta tag URL and receive the uploaded image URL in response, permanently. However, in my experiments, it looks like sometimes the serverless function runs for some time (3-5 seconds) and meta scrappers just default to not having any image instead of waiting for the image URL. What I’m doing is a bit different: I’m “fetching” this serverless function in useEffect of the post’s page and “hardcode” the resulting URL in the meta tag (since I know upfront what the URL would be, it’s easy to know beforehand what URL to use for every post — it always look like this: https://.../social-images/{POST TITLE}.png)
**UPDATE: **Well, apparently, it’s more performant to add the URL to the serverless function directly to the meta tag after all. Sorry about the confusion :)
Considerations
There are some checks and considerations in place. First, the function checks if the image already exists, and if so, it returns it’s URL right away. Next, there are default values in place: in case the function doesn’t receive a title or post date, it would use placeholders to still produce an image. Now, it takes up to 5 seconds for the image to be generated for the first time; if you attempt to share the post immediately after publishing without visiting it first, scrappers may not wait until the image is generated and use a default image or no image instead. These are some of the things to keep in mind and improve down the road.